

Medusa Marketplace #1 | Let's follow THE recipe
In this first part, we will cover the official Medusa recipe and add some tiny adjustments for our Marketplace needs.
Hello Everyone,
My name is Adil (a.k.aadevinwild), and I'm passionate about Medusa.js.
Last year, I embarked on my first (client) project using Medusa.js to build a marketplace. Since then, Medusa has undergone significant improvements, and I believe it's beneficial to share insights on constructing a marketplace with the latest versions.
A marketplace is...
A marketplace, conceptually, is a platform where multiple vendors can sell various products to numerous customers. One key aspect I've learned is that typically, the marketplace retains funds until certain conditions are met (e.g an order has been delivered to the customer), after which payouts are made to vendors, including fees.
In this blog series, we'll delve into building a specific type of marketplace—a clothing marketplace where anyone can register and start selling their products.
While we won't cover every detail, the aim is to equip you with the knowledge to customize Medusa.js for creating a simple yet functional marketplace.
You'll likely need to manage many aspects independently, but this guide will prepare you well.
It's important to note that not every marketplace will be identical, and the provided examples might not exactly match the marketplace you envision.
Let's start by following the recipe detailed in the Medusa documentation. The documentation covers various concepts and sometimes includes actual code implementations.
This will be a heavy first part, as it will condense certain points from the official documentation, but I promise that the rest of the parts will be lighter in terms of text.
Before we start...
As we progress through this series, we will be enhancing and altering some of Medusa's fundamental logic and functionality.
However, the ability to use the sales channels feature flag may be impossible upon the design approach taken.
The current design of the Cart system, particularly its integration with sales channels, poses a challenge. It is structured in a way that precludes the possibility of associating multiple sales channels with a single Cart.
If you wish to leverage the sales channels feature, you have the flexibility to modify the Cart system or develop a similar mechanism to fully capitalize on its capabilities.
You'll learn how to disable the sales_channels feature flag by clicking here.
Following the recipe
The first part of our journey involves extending entities. The documentation guides us on how to begin this process, starting with the concept of a User linked to a Store (where the User acts as a vendor, it's distinct from a Customer).
Extending the User entity
Here’s how we can start extending the User entity:
// src/models/user.ts
import {
  Column,
  Entity,
  Index,
  JoinColumn,
  ManyToOne,
} from "typeorm"
import {
  User as MedusaUser,
} from "@medusajs/medusa"
import { Store } from "./store"

@Entity()
export class User extends MedusaUser {
  @Index("UserStoreId")
  @Column({ nullable: true })
  store_id?: string

  @ManyToOne(() => Store, (store) => store.members)
  @JoinColumn({ name: "store_id", referencedColumnName: "id" })
  store?: Store
}
Extending the Store entity
Next, we extend the Store entity to include a new property representing our OneToMany relationship, which is necessary to avoid type errors in the previously extended User model :
// src/models/store.ts
import { Entity, OneToMany } from 'typeorm';
import { Store as MedusaStore } from '@medusajs/medusa';
import { User } from './user';

@Entity()
export class Store extends MedusaStore {
    @OneToMany(() => User, (user) => user.store)
    members?: User[];
}
Our First Migration
After extending the User and Store entities, we proceed with a database migration to reflect these changes in the schema. We continue following the recipe by executing the following command in our terminal:
npx typeorm migration:create src/migrations/add-user-store-id
Here's how we replace the up and down functions in our new migration with the ones provided in the docs :
public async up(queryRunner: QueryRunner): Promise<void> {
    await queryRunner.query(
      `ALTER TABLE "user" ADD "store_id" character varying`
    );
    await queryRunner.query(
      `CREATE INDEX "UserStoreId" ON "user" ("store_id")`
    );
}

public async down(queryRunner: QueryRunner): Promise<void> {
    await queryRunner.query(
      `DROP INDEX "public"."UserStoreId"`
    );
    await queryRunner.query(
      `ALTER TABLE "user" DROP COLUMN "store_id"`
    );
}
How to apply migrations ?
To apply these migrations, we build our server and run the CLI command:
yarn build
npx medusa migrations run
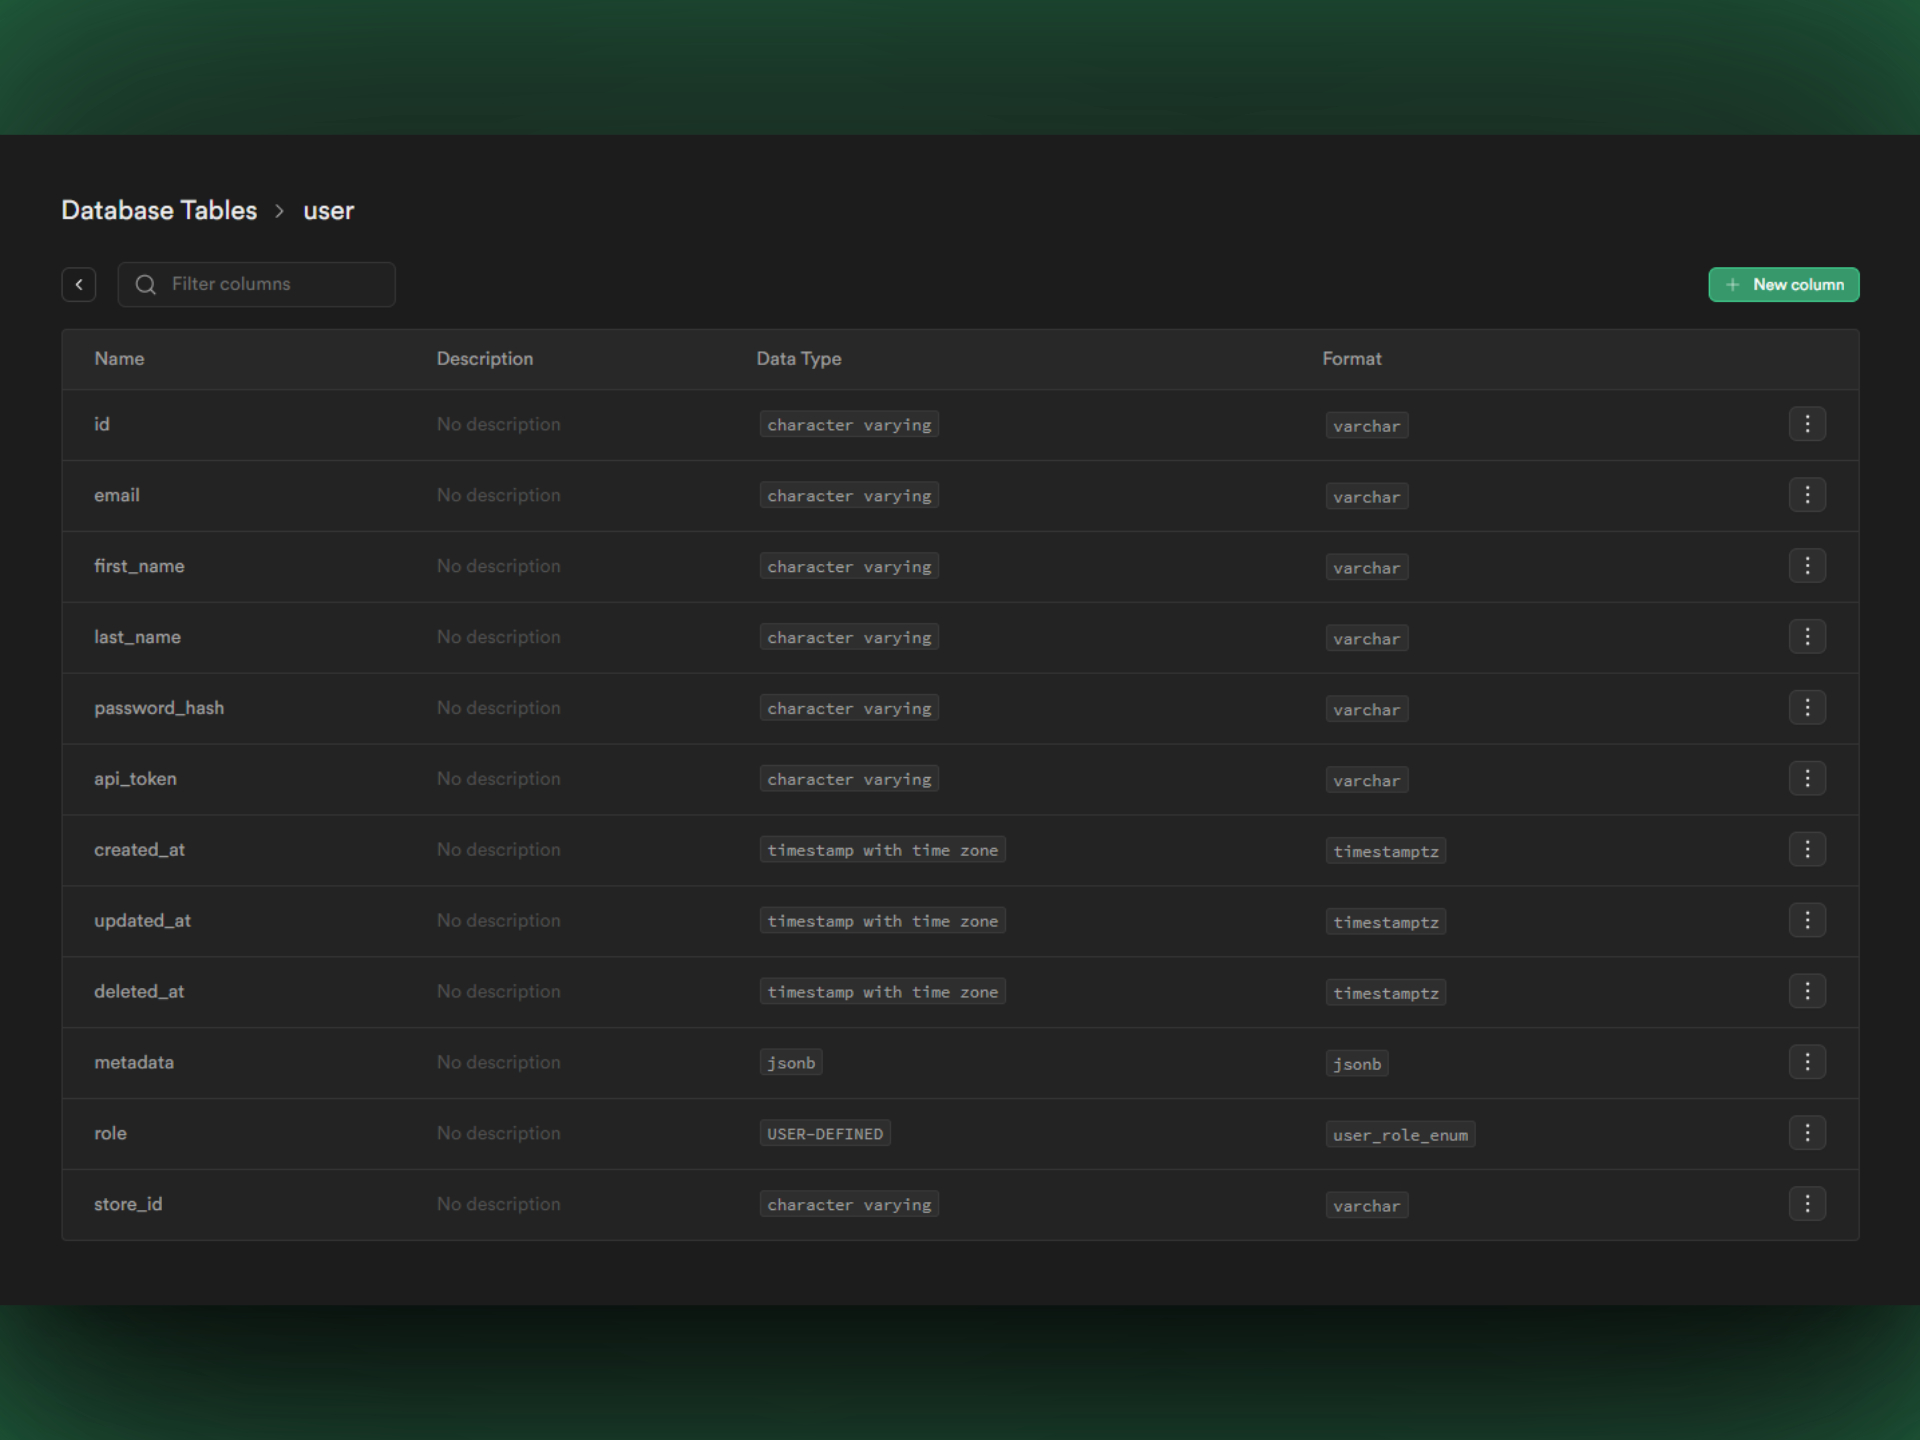
If we check our database now, we should see a new store_id column in the user table!
Our First Middleware
We have just set up the foundation for our marketplace by extending the User and Store entities and creating the necessary migrations. Now, we'll dive deeper into customizing the data management functionalities using middleware and service extensions.
Registering a Logged-in User / Middleware
Medusa.js provides a way to create middleware that can be applied to specific routes. In the context of our marketplace, we want to ensure that the logged-in user's information is available throughout our application, especially when retrieving data. Let's create a new middleware that will register the logged-in user in the request scope:
// src/api/middlewares.ts
import {
  authenticate,
} from "@medusajs/medusa"
import type {
  MedusaNextFunction,
  MedusaRequest,
  MedusaResponse,
  MiddlewaresConfig,
  User,
  UserService,
} from "@medusajs/medusa"

const registerLoggedInUser = async (
  req: MedusaRequest,
  res: MedusaResponse,
  next: MedusaNextFunction
) => {
  let loggedInUser: User | null = null

  if (req.user && req.user.userId) {
    const userService =
      req.scope.resolve("userService") as UserService
    loggedInUser = await userService.retrieve(req.user.userId)
  }

  req.scope.register({
    loggedInUser: {
      resolve: () => loggedInUser,
     },
   })

  next()
}

export const config: MiddlewaresConfig = {
  routes: [
    {
      matcher: /^\/admin\/(?!auth|analytics-config|users\/reset-password|users\/password-token|invites\/accept).*/,
      middlewares: [authenticate(), registerLoggedInUser],
    },
  ],
}
In this middleware, we first check if there is a logged-in user in the request. If so, we retrieve the user's information using the userService.
We then register the loggedInUser value in the request scope, which can be accessed by other services and components.
/admin routes, except for a few specific routes that don't require authentication (This is why the long regex)Extending the User Service
Next, let's extend the UserService to automatically create a new store when a new user is registered. This will ensure that every user has a store associated with their account, which is a key requirement for our marketplace :
// src/services/user.ts
import { Lifetime } from "awilix"
import {
    UserService as MedusaUserService,
} from "@medusajs/medusa"
import { User } from "../models/user"
import {
    CreateUserInput as MedusaCreateUserInput,
} from "@medusajs/medusa/dist/types/user"
import type StoreRepository from "@medusajs/medusa/dist/repositories/store"

type CreateUserInput = {
    store_id?: string
} & MedusaCreateUserInput

class UserService extends MedusaUserService {
    static LIFE_TIME = Lifetime.SCOPED
    protected readonly loggedInUser_: User | null
    protected readonly storeRepository_: typeof StoreRepository

    constructor(container, options) {
        // @ts-ignore
        super(...arguments)

        this.storeRepository_ = container.storeRepository

        try {
            this.loggedInUser_ = container.loggedInUser
        } catch (e) {
            // avoid errors when backend first runs
        }
    }

    async create(
        user: CreateUserInput,
        password: string
    ): Promise<User> {
        if (!user.store_id) {
            const storeRepo = this.manager_.withRepository(
                this.storeRepository_
            )
            let newStore = storeRepo.create()
            newStore = await storeRepo.save(newStore)
            user.store_id = newStore.id
        }

        return await super.create(user, password)
    }
}

export default UserService
In this extended UserService, we override the create method to check if the user has a store_id associated with their account. If not, we create a new store and associate it with the user's account before creating the new user.
Let's run our server and try to create a new User, we can use Postman or HTTPie to make a POST request to /admin/users when logged-in.
Let's try with a simple payload like this one :
// [POST] /admin/users
{
    "email":"john@doe.com",
    "password":"1234"
}
You should get a server's response like this one :
{
   "user": {
      "email":"john@doe.com",
      "store_id":"store_01HX6NFWW7R7306VHQ1PSP8YN7",
      // ✅ ☝️ Just what we wanted!
      "id":"usr_01HX6NFX8G78KHB6KD3MDS69VH",
      "role":"member",
      "first_name":null,
      "last_name":null,
      "api_token":null,
      "metadata":null,
      "created_at":"2024-05-06T09:59:19.1182",
      "updated_at":"2024-05-06T09:59:19.118Z",
      "deleted_at":null
   }
}
Now, whenever we create a new User a new Store is associated to it !
What's Next ?
And this is where this first part of the series ends, as the recipe gives us a few more concepts, such as associating a store_id with the creation of a product etc., before moving on to the events/subscribers.
We're not going to tackle events just yet, but rather continue to focus on service management and how to extend them so as to have everything nicely tied up to a vendor.
Common Issues
I have CORS errors since I've added middlewares
If you have any CORS errors when accessing the Admin UI, this might solves your issue
ADMIN_CORS in your .env fileimport { authenticate, type MiddlewaresConfig } from '@medusajs/medusa'
import { parseCorsOrigins } from 'medusa-core-utils'
import * as cors from 'cors' // ⚠️ Make sure you import it like this
import registerLoggedInUser from './middlewares/register-logged-in-user'
export const config: MiddlewaresConfig = {
routes: [
{
matcher: /^\/admin\/(?!auth|analytics-config|users\/reset-password|users\/password-token|invites\/accept).*/,
middlewares: [
cors.default({ credentials: true, origin: parseCorsOrigins(process.env.ADMIN_CORS ?? '') }),
authenticate(),
registerLoggedInUser,
],
},
],
}
MyloggedInUserisundefinedornull
If you have this issue and are sure that you are logged in before making a request, please update your LIFE_TIME services to TRANSIENT, it should fix the issues :
// An example with the UserService extended earlier
class UserService extends MedusaUserService {
  static LIFE_TIME = Lifetime.TRANSIENT
  // ...
}
GitHub Branch
You can access the complete part's code here.
Contact
You can contact me on Discord and X with the same username : @adevinwild


